Showing posts with label homemade. Show all posts

Friday, 12 August 2016

Betty's Bakewell Tart


Everyone in the world needs a Betty. If you could bottle her spirit it would be the best tonic in the world! I'm talking about my friend Betty Wilson. When trying to think of how to describe what she does I'm at a loss to find the words. Yes, she used to do tarot readings, yes, she speaks with spirit and yes over the years of her life she has helped many people dead and alive but to me she is so much more than a clairvoyant, medium or psychic. She has been a rock, a guide and a guardian angel! My life has had many ups and downs and I've often felt very different to everyone I meet, that was up untiI I met Betty. She gave me a reading years ago and it was full of lovely things that were coming my way, low and behold it all turned out to be true. I'm happily married now with 3 children and 2 step-children. Thanks to the wisdom, guidance and a general shoulder to cry on that Betty offered over the last few years, I truly believe I have grown more as a person than I had in my life before she was in it. I do things now, that I wouldn't have dared or even imagined I could do, all because she tells me I can. She has been such a rock to me and never asks anything in return, as all she tells me is she gets all the happiness from seeing how I grow. The one thing she loves is a bakewell tart and I promised her I would make her one, it's the least I can do. She is a true friend, a real life angel and my guiding star so Betty's tart is my tribute to her.
For the pastry:
200g plain flour
100g unsalted cold cubed butter
100g icing sugar
30ml milk
Place all the ingredients in a bowl.
Run your hands under the cold tap for a minute as this helps with the rubbing process.
When you have dried your hands rub the butter into the flour until there are no lumps left and the mixture resembles crumbs.

At this point pour in the milk and stir with a blunt knife for roughly a couple of minutes until the dough forms a ball.
Knead the dough on a floured surface and make a smooth ball.
Clingfilm and pop into the freezer while you make the filling.
For the filling:
100g unsalted softened butter
100g sugar
100g ground almonds
Tsp almond essence
2 egg yolk
2 tbsp jam mixed until runny
Flaked almonds to top.

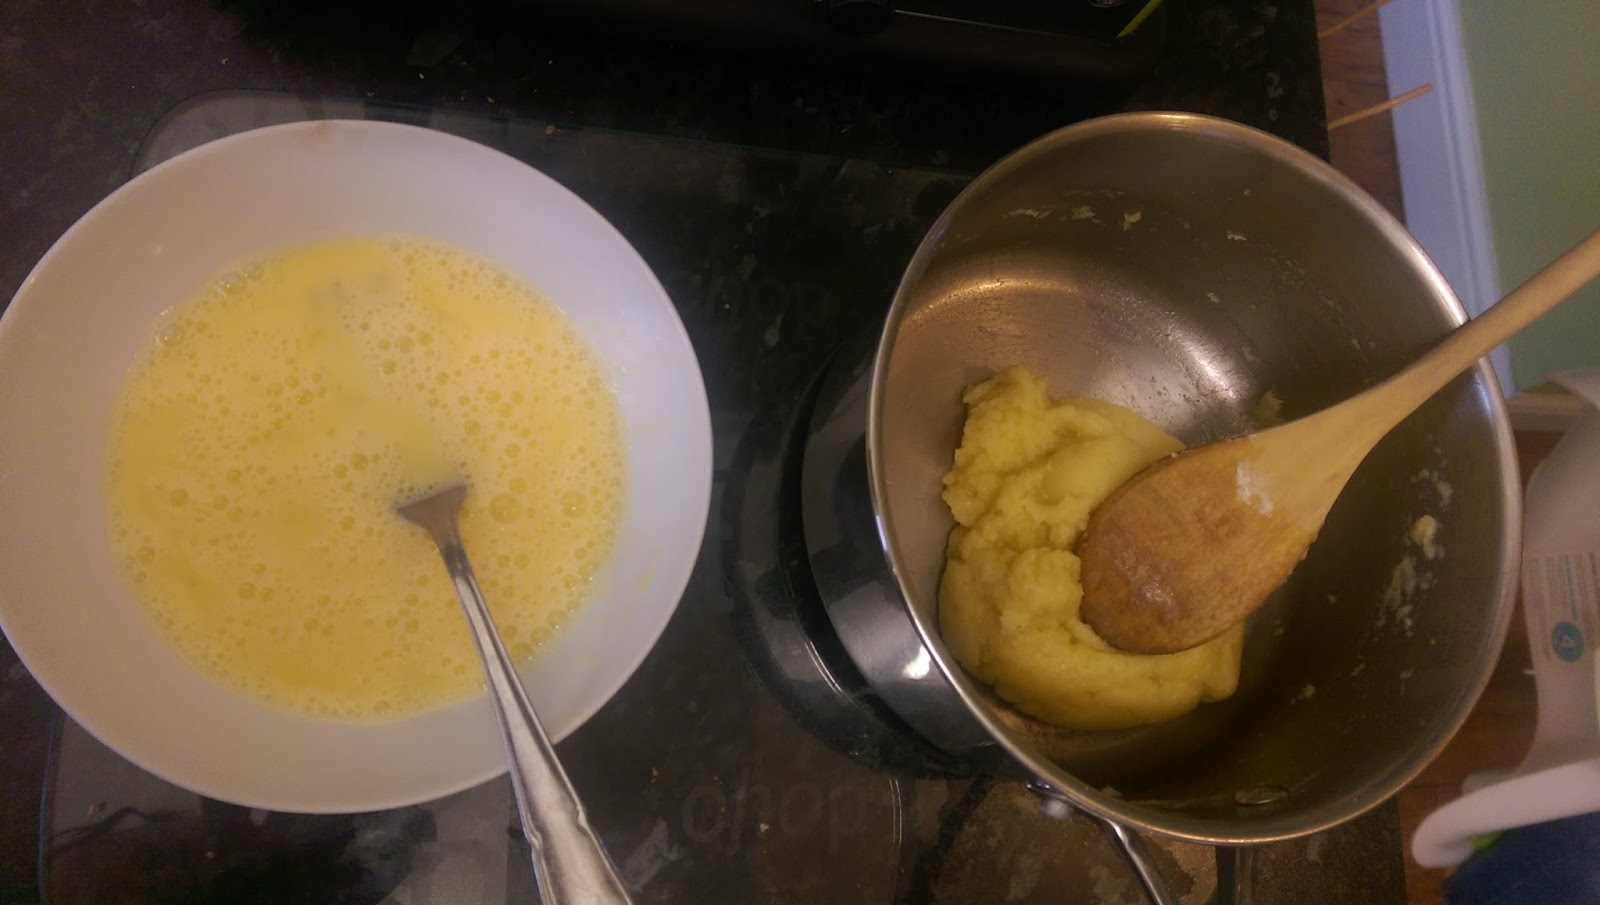
Beat the butter until it is soft and add the sugar.
Mix until fluffy and add the ground almonds, almond essence and egg yolks and combine.
Roll out your firm pastry ball until nice and thin.            
                                       

Carefully draping the pastry over your rolling pin place your dish underneath and trim the edges.
Spread your runny jam over the base.
Spoon in your filling and spread evenly and preheat the oven to 200.
As I had enough pastry left I rolled a long rectangle and cut out some lengths to make a lattice topping for the tart. Before assembling the top sprinkle on the flaked almonds.
Bake for 15 minutes at 200 then turn the oven down to 150 for a further 10-15 minutes.
Dust with icing sugar, serve with a fresh cup of coffee and say a little thank you to Betty Wilson for this fine treat!

Wednesday, 23 December 2015

Triple choc chip cookies


Don't you just love those cookies you get in the supermarkets. The ones in the paper bags, all gooey and chewy. They usually have a named sweet in them like Rolo or Smarties. Well I made some last night that tasted as good, if not better than those! They were a chocoholics dream. Triple chocolate cookies, verging on the consistency of a brownie in the middle and crispy on the outside, generously filled with chocolate chips. If you want to recreate the supermarket ones then replace the chocolate chips in the recipe for your chosen sweet, I can't wait to experiment! I'm going to try replacing the chocolate I used for chocolate orange for my next batch. Throw some nuts or oats in for a different texture, whatever you decide on let me know on my Facebook page How to be hard up and happy! I'd love to see your results.

150g plain flour sifted
100g chocolate melted (whichever you want)
200g chocolate chips or whatever chocolate sweets you want (from the fridge)
30g cocoa powder sifted
120g butter softened
75g brown sugar
50g white sugar
1/2 tsp bicarbinate of soda
1/2 tsp salt
Large egg beaten (from the fridge)

Preheat the oven to 170
In a bowl combine the flour, cocoa, salt and bicarbinate of soda
With a mixer if you have one (by hand is fine too it will give your arms a good workout!) cream together the butter and both sugars until light and fluffy (or until your arm feels like it's going to drop off) then add the melted chocolate and mix again until combined
Beat in the cold egg and add the dry ingredients
Fold in first, so the flour mix doesn't go everywhere, then mix
Once mixed stir in the chocolate chips/ sweets you are using
Using an ice-cream scoop or a spoon if you don't have one, dollop large amounts onto a greaseproof lined tray
                                  
No need to shape them just dollop and bake for 18 minutes
They will seem undercooked but I promise you they're ready 
Leave to cool for 5 minutes, this is the hardest part, it takes real willpower after smelling the chocolate wafting through the house
All that's left is to enjoy them with an ice cold glass of milk, or ice-cream, or cream, or.....just enjoy them
Here's my son Chase enjoying his this morning


Sunday, 20 December 2015

Yule love this log!

This one's for the unashamed chocoholics. How can you resist a light and spongy, cream and chocolate filled, chocolate log? Who needs a better excuse to rush and buy a load of fitness gear in January?! The time and effort that go into this are so worth it, no shop bought log will taste as good. You could go to town on the decorating it too if you're slightly artistic, or if like me you're just more realistic, stick some holly on it (for photographic purposes of course) and then whip it back off again and dig in!

To make the sponge
4 eggs
100g sugar
65g self-raising flour sifted
40g cocoa powder (I use Sainsburys own)

Place the eggs and sugar into a large bowl and mix until pale and frothy (use a mixer if you have one)
Sieve the cocoa powder and flour into the eggs and sugar mix and fold into the mixture taking care not to beat any of the air out
Line a large oven proof tray (I used my roasting tin) with greaseproof paper
Pour the mixture into the tin and spread into the corners 
Cook in a pre heated oven at 200 for 8-10 minutes until the mix is shrinking away from the sides

                          
See video for how to roll the log while still warm
                                
For the chocolate filling
200ml cream
200g plain chocolate

Melt the chocolate and cream together in a pan on a low/ medium heat until combined
Refridgerate until set
                           
Spread some of the chocolate mixture onto the sponge and if you like 150ml whipped cream on top
Roll back up again and cut a third of the cake at an angle and stand next to the rest of the log
Place the remainder of the chocolate into a piping bag with a star nozzle, or spread it on and make your own log design, you can't go wrong!
All that's left to do is get the kettle on and enjoy a slice!

Friday, 11 December 2015

'Tis the season to be a wally

Advent day 11 it's getting closer!! I'm excited anyway....So yesterday our advent 'surprise' was to decorate the Christmas cookie tree together. Most of the advent surprises end with together as that's what it's all about. Getting us all together, even if it's just for ten minutes before my husband rushes off to work. The other night we sang Christmas songs together (good job our neighbours live away most of the time they may have thought a cat was getting strangled!) It was hilarious and my son Chase who's nearly two thought we had all gone mad, although he danced and screamed "Yay!!!" at the end, so we must have done well. Anyway, here's my cookie tree recipe, don't worry if you haven't got the star cutters they're £4.99 on-line from Lakeland or you could always try cutting freehand stars, or even different sized circles to stack. This recipe gives you enough dough for twenty large to small cookies.

600g sifted plain flour
300g butter
300g sugar
Tsp vanilla extract
2 eggs beaten
Kg pack of ready roll icing (I got mine in Lidl)
Decorations (Again Lidl had some decent decorations, or the Pound shop)
Tbsp jam
In a bowl (or mixer if you have one) cream the butter and sugar until light and fluffy (as shown above)
Add the beaten eggs and vanilla and mix 
Add the flour gradually until a dough is formed divide into two balls, wrap in cling film and chill for an hour
                                                 
Roll out the dough to around 3-4mm thick and cut two of each size cookie re-rolling and cutting with the leftover scraps
Place cookies onto greaseproof lined baking trays and place in a pre heated oven at 180 for 12 minutes or until firm then place on a wire rack to cool
                            
Knead and roll out the icing until it's as thick as you like to top the cookies 
Cut two lots of each size for the icing too
Brush each cookie with some jam to stick the fondant icing in place
Let the children assemble the stack starting from the largest to the smallest (cookie not child)
                                               
We had loads of fun decorating the tree but not as much fun as we all had eating it      


Tuesday, 8 December 2015

Please yourself pie

Firstly I would like to say thank you to those of you reading my blog and trying out my recipes. I've had nearly 5000 views and I'm over the moon to think I may be helping some of you live a bit cheaper. In these frankly miserable days where the news throws out so much negativity, we really do need to spread some cheer! Now this recipe is great for using leftover turkey, as well as chicken, and is very tasty! It's cheap to make and very filling too. If you don't eat it all it's great cold the next day! You can pretty much throw in anything to fill it out, please yourself, if you have leftover stuffing , put that in, or some sausages need using up, throw them in. You could add cream or creme freche to make it a bit richer we had it without and it was still delicious. It's your pie put what you want in but the base is chicken/ turkey and leeks.

Leftover chicken/ turkey meat (I actually used a full chicken that was reduced to £2.79 in Lidl)
2/4 leeks sliced
Tsp dried thyme
3 rashers smoky bacon/ streaky whichever you have/want
150g mushrooms
1 pt chicken stock
Tbsp flour
Ready rolled puff pastry

Add chopped leeks to a pan with a nob of butter on a medium heat and sweat, with the lid, on stirring occasionally for about ten minutes.
Fry your chopped bacon strips on a high heat with the thyme and mushrooms.
Transfer the bacon and mushrooms into the leeks and stir in the flour until dissolved.
To deglaze the bacon pan, put it back on the heat and pour in some of the stock until any residue has dissappeared.
Pour all the stock into the pan with the leeks, not forgetting the stock from the frying pan with the flavour from the bacon!
Stir in the meat until it's bubbling nicely and simmer for ten minutes.
Transfer into an oven proof dish and top with the pastry.
Score some nice diagonal lines with a knife and if you want a golden pastry brush with beaten egg (it doesn't matter if you don't do this it just looks nicer)
Put into a preheated oven at 180 for 30-40 minutes or until the pastry is golden.


Tuesday, 24 November 2015

High tea, low cost!

Who doesn't love a bit of afternoon tea?  From playing with tea sets as a child I've always loved a cup of tea and a slice of what you fancy.  The luxury of a Botham's cream cake or a Coopland's scone with a nice cup of tea (is there any other kind?) is perfect to keep you satisfied until tea-time. I've always had a soft spot for an eclair, lovely fluffy choux pastry covered in chocolate, that crunches as you bite, oozing with whipped cream! The thing is when everybody wants one in my house it can cost a fair bit.....unless of course you could make them? No, surely not I hear you say, otherwise everybody would do it? I'll let you in on a secret....you can! I will tell you how then you will never need to spend extra money on a cheeky treat, and before you start thinking it's too complicated or time consuming, it's really not I've knocked this batch up in half an hour. Somehow I don't think they will last that long....

55g butter
75g plain flour sifted
150ml water
Choclate for melting (I used Lidl's own brand milk chocolate)
175ml double cream whipped
In a pan on a medium heat melt the butter in the water until bubbling as shown above.
Take pan off the heat and really quickly tip in the flour and stir vigorously until it comes together as shown above.
Leaving the pan off the heat to cool for a couple of minutes, whisk two eggs. Add these to the pan gradually, beating with the wooden spoon until the mixture turns into a glossy paste.
Spoon the mixture onto a baking tray lined with greaseproof paper. 
How much is up to you, if you use a small spoon you will have profiteroles, a large dollop gives you choux buns like I did, or you could use piping bag and make eclairs.
Place in a preheated oven at 200 for ten minutes, then turn up to 220 for a further 15 minutes, don't open the door until finished.
After they have cooled, slice them through the middle and you will be left with pockets perfect for filling with the cream.
You could mix the cream with lemon curd for a tangy kick, or even custard to make it go further.
When you have melted your chocolate in a bowl over some boiling water, just drizzle it over the buns and put in the fridge to set. Then all that's left to do is get the kettle on and enjoy!


Monday, 19 October 2015

Home made hats

While I was pregnant with my third (and definitely last) child, I had a lot of time on my hands. This resulted in severe boredom and it was then I discovered jumper hats! Using old jumpers/ tops that nobody wore any more I made some little baby hats from them! Firstly I cut 2 templates out of paper and pinned them to the jumpers. 
Then I cut them out and pinned them together. Take care to make sure the fabric you want to show on your hat is the fabric touching on the middle as you will turn it inside out when you have finished stitching.
Using whatever stitch you can do I think I used a running stitch (not sure as an no professional sewer!) Make sure you sew it all the way round not leaving too big a gap between stitches and when you're finished turn inside out. 
These were very therapeutic to make in the last trimester and looked so cute on my son when he was born! Very easy, free and unique! You can also make mittens in the same way to match with the leftover fabric.