Friday 30 October 2015

Tea so easy the kids made it

I have to start by admitting this doesn't look the most appetising dish granted. But it's so tasty and you can run wild with this one using up whatever vegetables you have left and turning them into a tasty  treat that the kids can get involved in making. Letting the little ones help is the best thing you can do for them after all its one of the biggest skills they will need in life. So these tasty vegetable fritters are pretty much open to being played with as you see fit try adding spices or herbs anything you like.

Med. Potato grated
Onion sliced
Carrot cubed
Red pepper cubed
Spring onion sliced
2 med tomatoes skinned, deseeded and sliced
2 tbsp sweet corn
2 tbsp frozen peas
100g flour
2 eggs
Salt and pepper
Oil for frying

Put all the vegetables in a bowl
Add the eggs and flour and mix well and season
Heat a frying pan with some oil on a medium heat and preheat oven to 180
Fry a tablespoon of the mix for two mins each side until golden and finish off in the oven for 10 mins.

Wednesday 28 October 2015

Slash the cost of Halloween!

With the spooky celebration looming, the children are getting excited and I have to admit so am I! I'm such a big kid I love an excuse to get the scissors and glue out. Having fun with the kids in the holidays doesn't have to cost a fortune. In fact the more effort you put in the less it will cost. I'm going through my black card rather fast this year luckily it was only around £3 from Amazon. I have spent £9 in the Poundshop on a few table accessories and some decorations to add to the ones I've made (mainly out of cheap bin bags) and the house is looking very creepy indeed.


Now the food for your party can be amazingly spooky too with a few tips.

350g plain flour 
2 tsp ground ginger
1 tsp bicarbinate soda
100g butter
175g brown sugar
1 egg 
4 tbsp golden syrup


My ginger zombies were so easy to make and very tasty too! Preheat your oven to 190
Putting the flour, ginger and bicarb into a bowl, rub in the butter
Add the sugar and stir in the syrup and egg to make a dough
Roll out onto a floured work surface about 5mm thick and cut out your zombies (I just used a gingerbread man cutter and snapped limbs off when cooked)
Cook on a tray lined with baking paper for 10-15 mins and decorate as you choose when cool.
For the scary strawberries it was simply melted white chocolate and some of the icing from decorating the zombies to draw in their shocked faces.
                                      
Get a plain old biro to draw on the satsumas the skin comes off anyway let your imagination run wild! Get the kids involved too.
                                      
These apple mummies were so effective. I found some bandages out of an old first aid kit in the cupboard and wrapped them round and stuck some eyes on. Let's just hope no-one needs a bandage now! I hope these tips help you to have a fun, happy and mainly inexpensive Halloween!

Monday 26 October 2015

5 a day low cost lasagne


I'm back after a hectic weekend and it's one of my favourite school holidays, the Halloween half term! The crafting with leaves, cooking comforting winter warmers and decorating the house for our Halloween party. I have to admit at this point, I hate recipes and I'm finding this difficult as I don't really work in set quantities. I'm more of a chuck it in and hope for the best kind of girl and it usually pays off. So I'll do my best with this next recipe but I promise you, you can't go wrong use whatever vegetables you want! So cheap as it's meat free but definitely as tasty (if not tastier) here's my roasted veggie lasagne.

Any veg you like (as long as it's chunky)
Example recipe
2 carrots 
2 red onions
3 peppers different colours for variation
Courgette
Butternut squash
Whole bulb garlic
2 jars of tomato pasta sauce
Lasagne sheets (as many as you need for a rectangle oven dish)

For the home made white sauce
Butter
Flour
Milk
Cheese

Cube all the vegetables so they're roughly the same size.
Preheat oven to 200
Put cubed vegetables into a roasting tin with a good glug of oil and salt and pepper


After 30 mins, or when the veg is nicely soft and roasted transfer into  pan on the hob on a medium heat and warm through with the two jars of sauce, making sure you take the roasted garlic out of it's skin.
Meanwhile get a wooden spoon full of butter and melt on a medium heat in another pan.
Add to the butter a heaped tablespoon of flour and stir rapidly until it forms a thick paste (roux)
Gradually add milk whisking until the lumps come out until you have a white sauce that's not to thick not too runny but it really doesn't matter.
Add some grated cheese (as much or as little as you like just keep tasting until it's to your liking)
Now you have your red and white layers ready you need an oven proof dish to assemble the lasagne.
I soak the pasta sheets prior to making the lasagne so they're soft, pour boiling water over them in a dish for a couple of minutes and they'll be ready. Take care to make sure they don't stick to each other though although again it won't matter.

Starting with half of the red mixture line the bottom of your dish with it and  cover totally with pasta sheets.
Top these with half of the white sauce and repeat.
Sprinkle with grated cheese and season with some pepper and bake at 200 for 25 minutes or until cheese is bubbling and golden. Serve with salad, chips, garlic bread or all three to make it stretch! I guarantee you won't miss the surprise pieces of gristle you get with mince.


Thursday 22 October 2015

More tips from the tightwad

Hello! I'd like to apologise for the lack of blogging over the last couple of days it's been tough with the teething toddler, I resemble something off  'Night of the living dead', on a positive though it's nearly Halloween so I should be fine for my costume. So I would like to share a bit more with you on how to keep the shopping bill low. I set myself a challenge this week to try and live on what was in the cupboards instead of doing the generic shop for the sake of it, as I wonder how many of us shop out of habit rather than necessity? I have to say I'm surprised we've made it to Thursday (alive) without having to buy anything other than a couple of essentials ( milk and butter so far) so this will have saved us money. Okay maybe only a short term solution, but if you're having a 'skint week', as we call them, you don't need to worry too much if you can knock something up out of your cupboards! I have been known to Google the ingredients I have and see what recipes it comes up with. I challenge you not to go for the next shop and see if you can live on what's there at least for a few days. I find this mentality helps to overcome the stress of not having enough money to buy lots of shopping and have always had this attitude whether I've been really hard up or not.

Monday 19 October 2015

Home made hats

While I was pregnant with my third (and definitely last) child, I had a lot of time on my hands. This resulted in severe boredom and it was then I discovered jumper hats! Using old jumpers/ tops that nobody wore any more I made some little baby hats from them! Firstly I cut 2 templates out of paper and pinned them to the jumpers. 
Then I cut them out and pinned them together. Take care to make sure the fabric you want to show on your hat is the fabric touching on the middle as you will turn it inside out when you have finished stitching.
Using whatever stitch you can do I think I used a running stitch (not sure as an no professional sewer!) Make sure you sew it all the way round not leaving too big a gap between stitches and when you're finished turn inside out. 
These were very therapeutic to make in the last trimester and looked so cute on my son when he was born! Very easy, free and unique! You can also make mittens in the same way to match with the leftover fabric.                                                

Sunday 18 October 2015

Cheapers creepers

With Halloween around the corner I'm sure a few of you are dreading the expense of decorations, sweets and costumes. I hate to think of people being unhappy because they think they need to spend a fortune to have a good time.We have had many a Halloween with hardly any money, but have always managed to have loads of fun. I'd love to share some ideas for you to try with your children, which will not only save you money, but give the children hours of entertainment. With materials you can pick up in most cheap shops, on the internet, or even things you throw away!

Milk bottle ghosts.
Get saving your empty milk cartons now and you will have enough come Halloween to make these simple but effective ghosts! All you need is milk cartons, some black paper/card and a set of fairy lights. Cut out eye and mouth shapes and stick to the cartons. Cut a hole in the back of the carton underneath the handle to fit the fairy lights in and your done! Very effective and fun to make.
Why stop there? You can do the eyes and mouth on a larger scale and stick them on your fridge or freezer to make them look ghostly too!

I have to admit I got rather carried away last year with the pack of black card I bought and ended up doing a mural on the wall! Again, so effective and the kids love making their own decorations far more than buying them.
We cut out bat and spider shapes and stuck them around the house. I looked around the house for things I could reuse that would have been thrown out and found a doll in my daughter's room. I pulled its arms and legs off and stuck the limbs in a jar with red food colouring and water (maybe a bit over the top?!) Like I said I get carried away!! 

We got some tissue and string/ wool and covered some lollypops to make ghosts.
As for costumes you really don't need to be buying them. All you need is a bit of imagination (or Google) and some old clothes you have lying around. Not one of us bought an outfit last year just a few accessories from the Pound shop,some face paint and a few Youtube tutorials. The results were quite impressive!

Neve as a zombie!
Louie as a devil!
Olivia as a doll

Archie as Edward Scissorhands

Lula and Chase as Chucky and Chucky's bride
With a lot of effort and very little money you can still have a fun Halloween and the kids will remember the time you spent with them rather than the money you spent on them. Watch this space for another Halloween instalment very soon! Thanks for reading and have a happy Halloween!!


Saturday 17 October 2015

Cheap winter warmer or fancy starter? You decide!

Today's recipe is cream of onion soup, so simple and tasty. Considering it costs pence to make you can make it look like a starter in any top restaurant with a couple of finishing touches. It's a nice, filling winter warmer served as either a lunch with crusty bread or toast, or as indeed a starter with some croutons and a cheese crisp, if you fancy cooking a meal for your other half on the cheap. My husband and kids love it, even the dog polished off some I spilled on the floor and he seemed to like it too!

Serves 4
3 med-large white onions
1 pint chicken stock (ideal if you have some leftover from the chowder like me)
40g butter/marg or 2tbsp oil
2 tbsp flour
1/2 pint milk or 300ml single cream (richer with cream but still as tasty with milk)
Salt and pepper to taste.

For the croutons

1 slice bread sliced into squares
Oil

Fry in a pan until golden. Done! (You could always toast the bread for a healthier alternative)


 For the cheese crisps grate some cheese, I just used mature cheddar, and place on some greaseproof paper in little mounds and cook on high for a few minutes (just keep checking them until they bubble and melt) leave them to cool.

For the soup, chop the onions into slices roughly and on a medium heat melt the butter. Sweat the onions in the butter for about 5 minutes, stirring occasionally so they don't stick to the pan.
 When they are clear and soft add the flour and stir in. Turning the heat up a bit higher add the chicken stock gradually to the floury onions stirring constantly until the flour dissolves and you have added all the liquid. Boil for a few minutes and turn down to a lower heat stir in the milk/cream. I prefer to leave salt and pepper for people to season as they like it individually. Dish up and add your croutons and cheese crisp and a drizzle of oil for presentation!


Friday 16 October 2015

Transforming a room on a budget

Kid's furniture looking shabby? Don't have the spare cash to replace it? I may be able to help you! My daughter's furniture had got a few marks on it and was looking rather worse for wear. There was nothing wrong with it so I didn't see the point in buying new when I could just give it a facelift. I bought some sticky back plastic with an animal print design and some purple paint. I painted a feature wall in their room and bought a cheap zebra print duvet cover (Amazon I think). I also covered a chair with some zebra fabric to make it fit in with the new decor. 

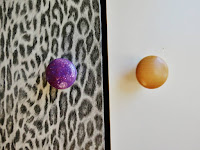
As you can see in the next picture, the before and after results on the wardrobe door. I removed the wooden knobs and put the sticky back plastic on the door taking care not to get bubbles in it.

 After I did this I decided the knobs would look boring plain and as I'd done a purple wall I had some paint left over so using this I painted the door knobs. My daughter had some purple sparkly nail varnish I used this to coat the knobs. It looked pretty impressive I thought!
 
I repeated this process on the drawer fronts of their desk too. It really was so easy and quite theraputic!
The girls loved their new room and it didn't cost a great deal at all. I just wanted to show you that even on a low budget you really can transform a room or liven up some old furniture with a bit of paint and nail varnish! It was also fun to do and I was happy my daughters had new furniture without having to buy any.....bonus!


Thursday 15 October 2015

Cheap chicken chowder

So you've had a chicken dinner and are stumped how to use the leftovers? Let me show you one of my favourite leftover chicken recipes from Jamie's money saving meals. All my kids love this winter warmer when I cook it and to make it go that bit further I make some really simple herby dumplings that my 9 year old usually makes. You need to make sure you strip that chicken of every piece of meat. When I strip a chicken I always joke that it looks like a seagull's been at it! Now the skin comes in handy here too so any leftover skin keep even if it doesn't look too appetising, when you've finished with it you will never throw any skin again that I can promise you. You can make your own chicken stock too and I promise you it's easy, you literally put the chicken carcass in a pan (if you don't have a stock pot it doesn't matter, just break the carcass up so it fits in a regular pan) cover with roughly 2litres water and boil for 30-45 minutes. That's it. Simple. You can add what you want to your stock if you want throw in some veg peelings, the ends of the carrots, that old onion that's good for nothing you were going to throw, some herbs....or just water up to you. When your stock's boiled, just pour the lot through a colander (now don't forget to put a bowl under your colander, I have been known with my baby brain to tip my stock down the sink!) then I seive it back into a container just to make sure all the bits are out and that's that. Stock done. You can do this on the day or in advance, it's up to you, it freezes well too.
(J)Amy's (see what I did there?) chicken chowder

3 rashers streaky smoked bacon
Chicken skin
Leftover chicken 
2 carrots
Large potato
Onion
500g sweetcorn
2 litres home-made chicken stock

Snip the bacon and chicken skin into thin strips and fry over a high heat in a large pan.
When they are very crispy and fat has melted remove them from the pan with a slotted spoon leaving all the fat in the pan. These are for garnish so set aside until you serve.
Chop the carrots, onion and potato (leave the skin on the potato) into small chunks. 
In the same pan and the same fat you cooked the bacon in, add a bit of oil to the existing fat and fry the veg over a medium heat for roughly 20 minutes, until the onions are clear.
Add the stock to the veg.
Put the sweetcorn and leftover chicken in the broth and let it bubble away for another 20 minutes or until the potatoes are soft.
Using any type of blender/ food processor take about a third of the broth and blend it.
Pour the mixture into an oven proof dish with the rest of the broth and stir.
To make the dumplings it really couldn't be any easier.

Thyme (or mixed herb) dumplings

200g self-raising four
Dried thyme/ mixed herbs
Salt and pepper
Water

To the flour add the herbs and season.
Add water slowly and stir with fingers until it forms a doughy ball.
Rip rough lumps and form into balls.
Pop them on top of the chowder and bake in a pre-heated oven on 200 for 25 mintues.
Serve with the bacon and chicken skin garnish. Enjoy!


Wednesday 14 October 2015

Meat free midweek meal

A simple but tasty and cheap tea we love in our house. Stuffed peppers with corn on the cob! Ok, granted, it's not a gourmet meal and doesn't look like a lot, but it's very filling and tasty too, You can add any filling you want, if there's some leftover chilli or bolognese stick that in instead of rice. So if you're looking for something new to try out fancy a change give it a go! I'll give you the recipe for 4 people.
4 large peppers                                             
2 packs of supermarkets own brand chicken/ veg flavour rice.                           
4 corn cobs
Grated cheese


Firstly cook your rice as stated on the packet (usually 425mls cold water and boil with rice until water has been absorbed).
Slice the top of the pepper off and put to one side.
Hollow out your pepper so it's like a bowl and if needed just slice a bit of the bottom so it stands up.
When rice is cooked fill your pepper bowls with rice and grated cheese (or optional fillings) and place pepper lid back on.
Cook in a preheated oven on 180 for 20-25 minutes.
Five minutes before they're cooked put the corn cobs into boiling water and they will be ready with the peppers.

Now, as this wasn't a great deal (filling as it is) we decided to have a crumble for dessert. We had some apples given so you can't get much cheaper and at this time of year there are plenty about! I had some frozen berries left which I bought from Lidl, but you could get out brambling with the kids. Tea tastes even better for free! 

6-8 med apples peeled and chopped into chunks (if using cooking apples add sugar when cooking)
Whatever other fruit you want to add
150g flour
75g butter cut into chunks
75g sugar (brown, white, whatever you want)
1-2 tsp mixed spice/ cinnamon (optional)


Add chopped fruit and mixed spice/cinnamon to a pan on medium heat and leave to stew for about 5-10 minutes until soft.
Meanwhile in a bowl pour in flour, sugar and chunks of butter and rub everything in until there are no big lumps of butter left.
When the fruits cooked pour into oven proof dish and top with crumble mix. 
Cook for 25-30 mins on 180
Serve with custard, cream or ice-cream.

Well that's it for now if anyone tries this I would love to know how you get on!